|
|
Post by AlbEagle on Apr 20, 2018 21:55:54 GMT 2
Hi everyone I just published the Faceplate to be 3D Printed. You can find the .stl files on the website.    |
|
|
|
Post by hannes1 on Apr 22, 2018 7:54:50 GMT 2
Fine fine,
What are the costs for this?
|
|
|
|
Post by AlbEagle on Apr 22, 2018 12:58:40 GMT 2
Fine fine, What are the costs for this? About 2.4 Euro material cost to print according to Simplify3D calculations (the software I use to 3D Print). |
|
bart
New Member

Posts: 23
|
Post by bart on Apr 22, 2018 20:55:53 GMT 2
And not to forget 8 hours of electricity for 1 faceplate ;-)
|
|
|
|
Post by AlbEagle on Apr 22, 2018 21:22:38 GMT 2
Yes that is correct. Better would be white acrylic painted with black and laser engraved text. Since I don't have a laser engraver I had to do it this way. 2.4 Hours for one half so let's say 6 hours for the whole radio. It is something you do it once  |
|
|
|
Post by Glen on Jun 3, 2018 22:14:02 GMT 2
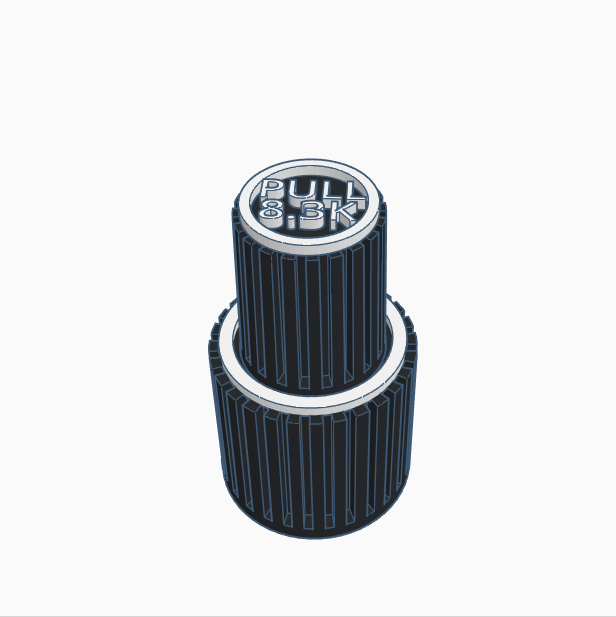
I see images of 3d rectangle white buttons and encoder knobs. Do you have .stl files for them? Your Sim design is Awesome. Would be happy to donate for them.
Thank you,
Glen
|
|
|
|
Post by AlbEagle on Jun 4, 2018 0:47:01 GMT 2
I see images of 3d rectangle white buttons and encoder knobs. Do you have .stl files for them? Your Sim design is Awesome. Would be happy to donate for them. Thank you, Glen Hi there Glen Here is the link for the Knob: Knobs and here is the link for the Buttons (please check the description on thingiverse on how I print them): Buttons |
|
|
|
Post by Glen on Jun 4, 2018 3:12:51 GMT 2
Thank You!!!
|
|
|
|
Post by wonderfly1 on Nov 20, 2018 23:11:38 GMT 2
Hello,
Sorry to revive an old thread, but thought it would be good to keep the information in the same place. I'm looking for tips on printing the buttons with text and radio face plates. I'm using Cura and set the Pause at Z post processing script to change the filament, however I can't get the text to print on the button. It prints just a small amount of the text and stops. I've also tried printing directly on the build plate and get similar results. Any Cura users out there? I'm using an Ender 3 as the printer and a 0.4 mm nozzle. I do have a 0.2 mm nozzle I could switch to if that would work better.
|
|
jlp
New Member

Posts: 5
|
Post by jlp on Nov 21, 2018 9:33:57 GMT 2
Hello, Sorry to revive an old thread, but thought it would be good to keep the information in the same place. I'm looking for tips on printing the buttons with text and radio face plates. I'm using Cura and set the Pause at Z post processing script to change the filament, however I can't get the text to print on the button. It prints just a small amount of the text and stops. I've also tried printing directly on the build plate and get similar results. Any Cura users out there? I'm using an Ender 3 as the printer and a 0.4 mm nozzle. I do have a 0.2 mm nozzle I could switch to if that would work better. Hi wonderfly. Did you try to print the text directly on the bed with a brim and a support ? Did you try to modify the Z ratio (x=100%, Y=100 and z = 105%) ? I'm currently using Cura on a disoceasy 200. Printing the radio face plate was not easy (warping). I'll print the text next WE . I 'll let you know. Regards. Jean-luc |
|
|
|
Post by wonderfly1 on Nov 25, 2018 1:11:12 GMT 2
Thanks for the reply.
I found with the original text I needed to go to 160% on the Z ratio to get Cura to slice it correctly, which made it exceed the button size. I did have some success generating new text using Arial Black in Bold in Fusion 360. This sliced and printed well using a 0.2 nozzle. I also haven't had success with the Z-offset plugin in Cura. It doesn't seem to offset the part at all. Nothing like waiting 20 mins for the button the print, then loading the text and having the head run right into the button and knock it off the build plate in the first 5 seconds. I did that several times and then learned about the simulation feature in Cura... After manually editing the G-code to specify the Z position, it is working as it should. I may end up printing a "fixture" that lets me put the buttons in at the center position and then print on top of them. I wouldn't have imagined this part to be as difficult as it has turned out to be.
I haven't done the face plate yet, but in my attempt to slice it, it appears the text does not slice well either, so I may need to recreate the text in a different font. Wanted to get the process down with the buttons before I went for the face plate.
|
|
|
|
Post by AlbEagle on Nov 25, 2018 17:10:10 GMT 2
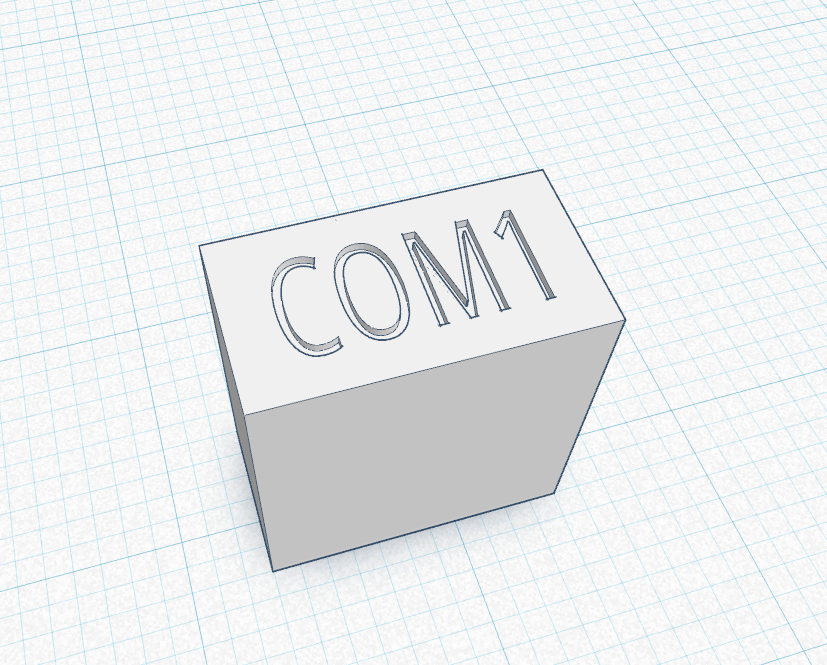
Another option would be to lower the letters into the buttons leaving them kind of engraved into them and after printing, filling them with white color.  Here (and on the website as well) is a stl file with engraved letters on buttons. Buttons with engraved letters and here is only one button (Com1) to try out how it works. Com1 engraved |
|
|
|
Post by wonderfly1 on Nov 25, 2018 17:52:48 GMT 2
Thanks, that's a great idea, I'll give that a try!
|
|
spk
New Member

Posts: 8
|
Post by spk on Feb 18, 2019 20:09:48 GMT 2
Hello everybody,
Does any one have any face plate files to share?
Shane
|
|
|
|
Post by username on Feb 24, 2019 20:06:07 GMT 2
Hello everybody, Does any one have any face plate files to share? Shane Sorry I haven't responded. I think this is what your looking for: Thingiverse Link |
|